Install Odoo 11 on CentOS 7
Updated on
•6 min read

Odoo is the most popular all-in-one business software in the world. It offers a range of business applications including CRM, website, e-Commerce, billing, accounting, manufacturing, warehouse, project management, inventory and much more, all seamlessly integrated.
Odoo 11 requires Python 3.5 which is not available in the CentOS repositories. Because of that, we cannot install the Odoo package via yum from the Odoo repository.
We either run Odoo in a docker container or install it in a Python virtual environment.
In this tutorial, we’ll walk you through how to install Odoo 11 using Git source and Python virtual environment on a CentOS 7 machine.
Before you begin
Log in to you CentOS machine as a sudo user and update the system to the latest packages:
sudo yum updateEnable the EPEL repository by typing:
sudo yum install epel-releaseWe will install Python 3.5 packages from the Software Collections (SCL) repository.
By enabling SCL you will gain access to the newer versions of programming languages and services which are not available in the core repositories. Enable the SCL repository with the following command:
sudo yum install centos-release-sclInstall Python 3.5 packages, with the following command:
sudo yum install rh-python35Finally install git, pip and all the tools required to build Odoo dependencies:
sudo yum install git gcc wget nodejs-less libxslt-devel bzip2-devel openldap-devel libjpeg-devel freetype-devel postgresql-develCreate Odoo user
Create a new system user and group with home directory /opt/odoo that will run the Odoo service:
sudo useradd -m -U -r -d /opt/odoo -s /bin/bash odooInstall and configure PostgreSQL
Install the PostgreSQL server and create a new PostgreSQL database cluster:
sudo yum install postgresql-serversudo postgresql-setup initdb
Once the installation is completed, enable and start the PostgreSQL service:
sudo systemctl enable postgresqlsudo systemctl start postgresql
Create a PostgreSQL user with the same name as the previously created system user, in our case odoo:
sudo su - postgres -c "createuser -s odoo"Install Wkhtmltopdf
The wkhtmltox package provides a set of open-source command line tools which can render HTML into PDF and various image formats. In order to print PDF reports, you will need the wkhtmltopdf tool. The recommended version for Odoo is 0.12.1 which is not available in the official CentOS 7 repositories.
To download and install the recommended version run the following commands:
wget https://github.com/wkhtmltopdf/wkhtmltopdf/releases/download/0.12.1/wkhtmltox-0.12.1_linux-centos7-amd64.rpmsudo yum localinstall wkhtmltox-0.12.1_linux-centos7-amd64.rpm
Install and configure Odoo 11
We will install Odoo from the GitHub repository so we can have more control over versions and updates. We will also use virtualenv which is a tool to create isolated Python environments.
Before starting with the installation process, make sure you [switch to the user] “odoo”:
sudo su - odooTo confirm that you are logged-in as odoo user you can use the following command:
whoamiNow we can start with the installation process, first clone the odoo from the GitHub repository:
git clone https://www.github.com/odoo/odoo --depth 1 --branch 11.0 /opt/odoo/odoo11Enable software collections so we can access the python 3.5 binaries:
scl enable rh-python35 bashCreate a new virtual environment for our Odoo installation with:
cd /opt/odoopython3 -m venv odoo11-venv
activate the environment:
source odoo11-venv/bin/activateand install all required Python modules:
pip3 install -r odoo11/requirements.txtBefore you begin section.Once the installation is completed deactivate the environment and switch back to your sudo user using the following commands:
deactivateexitIf you plan to install custom modules it is best to install those modules in a separate directory. To create a new directory for the custom modules run:
sudo mkdir /opt/odoo/odoo11-custom-addonssudo chown odoo: /opt/odoo/odoo11-custom-addons
Next, we need to create a configuration file:
[options]
; This is the password that allows database operations:
admin_passwd = superadmin_passwd
db_host = False
db_port = False
db_user = odoo
db_password = False
addons_path = /opt/odoo/odoo11/addons
; If you are using custom modules
; addons_path = /opt/odoo/odoo11/addons,/opt/odoo/odoo11-custom-addons
superadmin_passwd to something more secure and adjust the addons_path if you’re using custom modules.Create a systemd unit file
To run odoo as a service we will create a odoo11.service unit file in the /etc/systemd/system/ directory with the following contents:
[Unit]
Description=Odoo11
Requires=postgresql.service
After=network.target postgresql.service

[Service]
Type=simple
SyslogIdentifier=odoo11
PermissionsStartOnly=true
User=odoo
Group=odoo
ExecStart=/usr/bin/scl enable rh-python35 -- /opt/odoo/odoo11-venv/bin/python3 /opt/odoo/odoo11/odoo-bin -c /etc/odoo11.conf
StandardOutput=journal+console

[Install]
WantedBy=multi-user.target
Notify systemd that we have created a new unit file and start the Odoo service by executing:
sudo systemctl daemon-reloadsudo systemctl start odoo11
You can check the service status with the following command:
sudo systemctl status odoo11● odoo11.service - Odoo11
Loaded: loaded (/etc/systemd/system/odoo11.service; disabled; vendor preset: disabled)
Active: active (running) since Wed 2018-03-28 20:13:30 UTC; 6s ago
Main PID: 16174 (scl)
CGroup: /system.slice/odoo11.service
├─16174 /usr/bin/scl enable rh-python35 -- /opt/odoo/odoo11-venv/bin/python3 /opt/odoo/odoo11/odoo-bin -c /etc/odoo11.conf
├─16175 /bin/bash /var/tmp/sclihoNjg
└─16178 /opt/odoo/odoo11-venv/bin/python3 /opt/odoo/odoo11/odoo-bin -c /etc/odoo11.conf
and if there are no errors you can enable the Odoo service to be automatically started at boot time:
sudo systemctl enable odoo11If you want to see the messages logged by the Odoo service you can use the command below:
sudo journalctl -u odoo11Test the Installation
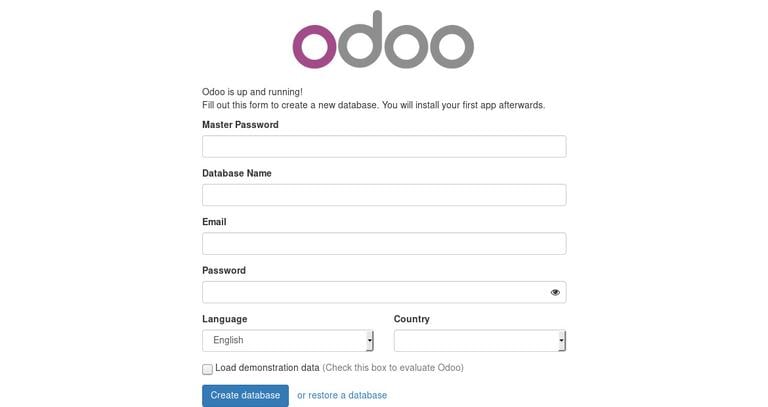
Open your browser and type: http://<your_domain_or_IP_address>:8069
Assuming the installation is successful, a screen similar to the following will appear:
Conclusion
This tutorial walked you through the installation of Odoo 11 on CentOS 7 in a Python virtual environment.
You may also want to check our tutorial about how to create automatic daily backups of your Odoo databases .
If you hit a problem or have feedback, leave a comment below.