How to Set Up a Firewall with FirewallD on CentOS 7
Updated on
•6 min read
A properly configured firewall is one of the most important aspects of overall system security.
FirewallD is a complete firewall solution that manages the system’s iptables rules and provides a D-Bus interface for operating on them. Starting with CentOS 7, FirewallD replaces iptables as the default firewall management tool.
In this tutorial, we show you how to set up a firewall with FirewallD on your CentOS 7 system and explain to you the basic FirewallD concepts.
Prerequisites
Before you start with this tutorial, make sure you are logged into your server with a user account with sudo privileges or with the root user. The best practice is to run administrative commands as a sudo user instead of root. If you don’t have a sudo user on your CentOS system, you can create one by following these instructions .
Basic Firewalld Concepts
FirewallD uses the concepts of zones and services, instead of iptables chain and rules. Based on the zones and services you’ll configure, you can control what traffic is allowed or disallowed to and from the system.
FirewallD can be configured and managed using the firewall-cmd command-line utility.
Firewalld Zones
Zones are predefined sets of rules specifying what traffic should be allowed based on the level of trust on the networks your computer is connected to. You can assign network interfaces and sources to a zone.
Below are the zones provided by FirewallD ordered according to the trust level of the zone from untrusted to trusted:
- drop: All incoming connections are dropped without any notification. Only outgoing connections are allowed.
- block: All incoming connections are rejected with an
icmp-host-prohibitedmessage forIPv4andicmp6-adm-prohibitedfor IPv6n. Only outgoing connections are allowed. - public: For use in untrusted public areas. You do not trust other computers on the network, but you can allow selected incoming connections.
- external: For use on external networks with NAT masquerading enabled when your system acts as a gateway or router. Only selected incoming connections are allowed.
- internal: For use on internal networks when your system acts as a gateway or router. Other systems on the network are generally trusted. Only selected incoming connections are allowed.
- dmz: Used for computers located in your demilitarized zone that have limited access to the rest of your network. Only selected incoming connections are allowed.
- work: Used for work machines. Other computers on the network are generally trusted. Only selected incoming connections are allowed.
- home: Used for home machines. Other computers on the network are generally trusted. Only selected incoming connections are allowed.
- trusted: All network connections are accepted. Trust all of the computers in the network.
Firewall services
Firewalld services are predefined rules that apply within a zone and define the necessary settings to allow incoming traffic for a specific service.
Firewalld Runtime and Permanent Settings
Firewalld uses two separated configuration sets, runtime, and permanent configuration.
The runtime configuration is the actual running configuration, and it is not persistent on reboots. When the Firewalld service starts, it loads the permanent configuration, which becomes the runtime configuration.
By default, when making changes to the Firewalld configuration using the firewall-cmd utility, the changes are applied to the runtime configuration. To make the changes permanent you need to use the --permanent option.
Installing and Enabling FirewallD
Firewalld is installed by default on CentOS 7, but if it is not installed on your system, you can install the package by typing:
sudo yum install firewalldFirewalld service is disabled by default. You can check the firewall status with:
sudo firewall-cmd --stateIf you just installed or never activated before, the command will print
not running. Otherwise, you will seerunning.To start the FirewallD service and enable it on boot type:
sudo systemctl start firewalldsudo systemctl enable firewalld
Working with Firewalld Zones
After enabling the FirewallD service for the first time, the public zone is set as a default zone. You can view the default zone by typing:
sudo firewall-cmd --get-default-zonepublic
To get a list of all available zones, type:
sudo firewall-cmd --get-zonesblock dmz drop external home internal public trusted work
By default, all network interfaces are assigned the default zone. To check what zones are used by your network interface(s) type:
sudo firewall-cmd --get-active-zonespublic
interfaces: eth0 eth1
The output above tells us that both interfaces eth0 and eth1 are assigned to the public zone.
You can print the zone configuration settings with:
sudo firewall-cmd --zone=public --list-allpublic (active)
target: default
icmp-block-inversion: no
interfaces: eth0 eth1
sources:
services: ssh dhcpv6-client
ports:
protocols:
masquerade: no
forward-ports:
source-ports:
icmp-blocks:
rich rules:
From the output above, we can see that the public zone is active and set as default, used by both eth0 and eth1 interfaces. Also, the connections related to the DHCP client and SSH are allowed.
If you want to check the configurations of all available zones type:
sudo firewall-cmd --list-all-zonesThe command prints a huge list with the settings of all available zone.
Changing the Zone of an Interface
You can easily change the Interface Zone by using the using --zone option in combination with the --change-interface option. The following command will assign the eth1 interface to the work zone:
sudo firewall-cmd --zone=work --change-interface=eth1Verify the changes by typing:
sudo firewall-cmd --get-active-zoneswork
interfaces: eth1
public
interfaces: eth0
Changing the Default Zone
To change the default zone, use the --set-default-zone option followed by the name of the zone you want to make default.
For example, to change the default zone to home you should run the following command:
sudo firewall-cmd --set-default-zone=homeVerify the changes with:
sudo firewall-cmd --get-default-zonehome
Opening a Port or Service
With FirewallD you can allow traffic for specific ports based on predefined rules called services.
To get a list of all default available services type:
sudo firewall-cmd --get-services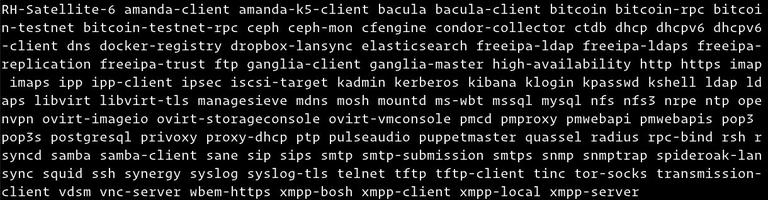
You can find more information about each service by opening the associated .xml file within the /usr/lib/firewalld/services directory. For example, the HTTP service is defined like this:
<?xml version="1.0" encoding="utf-8"?>
<service>
  <short>WWW (HTTP)</short>
  <description>HTTP is the protocol used to serve Web pages. If you plan to make your Web server publicly available, enable this option. This option is not required for viewing pages locally or developing Web pages.</description>
  <port protocol="tcp" port="80"/>
</service>
To allow incoming HTTP traffic (port 80) for interfaces in the public zone, only for the current session (runtime configuration) type:
sudo firewall-cmd --zone=public --add-service=http--zone option.To verify that the service was added successfully use the --list-services option:
sudo firewall-cmd --zone=public --list-servicesssh dhcpv6-client http
If you want to keep the port 80 open after a reboot you’ll need to type the same command once again but this time with the --permanent option:
sudo firewall-cmd --permanent --zone=public --add-service=httpUse the --list-services along with the --permanent option to verify your changes:
sudo firewall-cmd --permanent --zone=public --list-servicesssh dhcpv6-client http
The syntax for removing service is the same as when adding a service. Just use --remove-service instead of the --add-service option:
sudo firewall-cmd --zone=public --remove-service=http --permanentThe command above removes the http service from the public zone permanent configuration.
What if you are running an application such as Plex Media Server for which there is no appropriate service available?
In situations like these, you have two options. You can either open up the appropriate ports or define a new FirewallD service.
For example, the Plex Server listens on port 32400 and uses TCP, to open the port in the public zone for the current session use the --add-port= option:
sudo firewall-cmd --zone=public --add-port=32400/tcptcp or udp.To verify that the port was added successfully use the --list-ports option:
sudo firewall-cmd --zone=public --list-ports32400/tcp
To keep the port 32400 open after a reboot, add the rule to the permanent settings by running the same command using the --permanent option.
The syntax for removing a port is the same as when adding a port. Just use --remove-port instead of the --add-port option.
sudo firewall-cmd --zone=public --remove-port=32400/tcpCreating a new FirewallD Service
As we have already mentioned, the default services are stored in the /usr/lib/firewalld/services directory. The easiest way to create a new service is to copy an existing service file to the /etc/firewalld/services directory, which is the location for user-created services and modify the file settings.
For example, to create a service definition for the Plex Media Server we can use the SSH service file:
sudo cp /usr/lib/firewalld/services/ssh.xml /etc/firewalld/services/plexmediaserver.xmlOpen the newly created plexmediaserver.xml file and change the short name and description for the service within the <short> and <description> tags. The most important tag you need to change is the port tag, which defines the port number and protocol you want to open.
In the following example, we are opening ports 1900 UDP and 32400 TCP.
<?xml version="1.0" encoding="utf-8"?>
<service version="1.0">
<short>plexmediaserver</short>
<description>Plex is a streaming media server that brings all your video, music and photo collections together and stream them to your devices at anytime and from anywhere.</description>
<port protocol="udp" port="1900"/>
<port protocol="tcp" port="32400"/>
</service>
Save the file and reload the FirewallD service:
sudo firewall-cmd --reloadYou can now use the plexmediaserver service in your zones same as any other service..
Forwarding Port with Firewalld
To forward traffic from one port to another port or address, first enable masquerading for the desired zone using the --add-masquerade switch. For example to enable masquerading for external zone type:
sudo firewall-cmd --zone=external --add-masquerade- Forward traffic from one port to another on the same server
In the following example we are forwarding the traffic from port 80 to port 8080 on the same server:
sudo firewall-cmd --zone=external --add-forward-port=port=80:proto=tcp:toport=8080- Forward traffic to another server
In the following example we are forwarding the traffic from port 80 to port 80 on a server with IP 10.10.10.2:
sudo firewall-cmd --zone=external --add-forward-port=port=80:proto=tcp:toaddr=10.10.10.2- Forward traffic to another server on a different port
In the following example we are forwarding the traffic from port 80 to port 8080 on a server with IP 10.10.10.2:
sudo firewall-cmd --zone=external --add-forward-port=port=80:proto=tcp:toport=8080:toaddr=10.10.10.2If you want to make the forward permanent just append the --permanent option.
Creating a Ruleset with FirewallD
In the following example, we will show how to configure your firewall if you were running a web server. We are assuming your server has only one interface eth0, and you want to allow incoming traffic only on SSH, HTTP, and HTTPS ports.
Change the default zone to dmz
We will use the dmz (demilitarized) zone because by default it only allows SSH traffic. To change the default zone to dmz and to assign it to the
eth0interface, run the following commands:sudo firewall-cmd --set-default-zone=dmzsudo firewall-cmd --zone=dmz --add-interface=eth0Open HTTP and HTTPS ports:
To open HTTP and HTTPS ports add permanent service rules to the dmz zone:
sudo firewall-cmd --permanent --zone=dmz --add-service=httpsudo firewall-cmd --permanent --zone=dmz --add-service=httpsMake the changes effective immediately by reloading the firewall:
sudo firewall-cmd --reloadVerify the changes
To check the dmz zone configuration settings type:
sudo firewall-cmd --zone=dmz --list-alldmz (active) target: default icmp-block-inversion: no interfaces: eth0 sources: services: ssh http https ports: protocols: masquerade: no forward-ports: source-ports: icmp-blocks: rich rules:The output above tells us that the dmz is the default zone, is applied to the
eth0interface and ssh (22) http (80) and https (443) ports are open.
Conclusion
You have learned how to configure and manage the FirewallD service on your CentOS system.
Be sure to allow all incoming connections that are necessary for the proper functioning of your system, while limiting all unnecessary connections.
If you have questions, feel free to leave a comment below.