How to Install Tomcat 8.5 on Debian 9
Updated on
•6 min read

Apache Tomcat is an open-source application server which supports Java Servlet, JavaServer Pages, Java Expression Language and Java WebSocket technologies. It is one of the most widely used application and web server in the world today.
This tutorial will show you how to install Apache Tomcat 8.5 on Debian 9 and configure the Tomcat web management interface.
Prerequisites
Before continuing with this tutorial, make sure you are logged in as a user with sudo privileges .
We will download the Tomcat zip file using the wget utility and extract the downloaded archive with unzip .
If you don’t have these utilities installed on your system you can do it by typing:
sudo apt install unzip wgetInstall OpenJDK
Tomcat 8.5 requires Java SE 7 or later. To install the default OpenJDK package from the Debian 9 repositories run the following command:
sudo apt install default-jdkCreate Tomcat user
Running Tomcat as a root user is a security risk and is not recommended.
To create a new system user
and group for our Tomcat instance with home directory of /opt/tomcat run the following command:
sudo useradd -m -U -d /opt/tomcat -s /bin/false tomcatDownload Tomcat
We will download the latest version of Tomcat 8.5.x from the Tomcat downloads page . At the time of writing, the latest version is 8.5.37. Before downloading the zip file you should check the download page for a new version.
Change to the /tmp directory and download the zip file with wget:
cd /tmpwget http://www-us.apache.org/dist/tomcat/tomcat-8/v8.5.37/bin/apache-tomcat-8.5.37.zip
When the download is completed, run the following commands to extract the zip file
and move
it to the /opt/tomcat directory:
unzip apache-tomcat-*.zipsudo mkdir -p /opt/tomcatsudo mv apache-tomcat-8.5.37 /opt/tomcat/
To have more control over Tomcat versions and updates, we will create a symbolic link
named latest which will point to the Tomcat installation directory:
sudo ln -s /opt/tomcat/apache-tomcat-8.5.37 /opt/tomcat/latestLater when you will be upgrading the Tomcat version you can simply unpack the newer version and change the symlink to point to the latest version.
Change the ownership
of the /opt/tomcat directory to user and group tomcat so the user can have access to the tomcat installation:
sudo chown -R tomcat: /opt/tomcatalso make the scripts inside bin directory executable by issuing the following chmod
command:
sudo sh -c 'chmod +x /opt/tomcat/latest/bin/*.sh'Create a systemd unit file
Create a new tomcat.service unit file in the /etc/systemd/system/ directory with the following contents:
[Unit]
Description=Tomcat 8.5 servlet container
After=network.target

[Service]
Type=forking

User=tomcat
Group=tomcat

Environment="JAVA_HOME=/usr/lib/jvm/default-java"
Environment="JAVA_OPTS=-Djava.security.egd=file:///dev/urandom"

Environment="CATALINA_BASE=/opt/tomcat/latest"
Environment="CATALINA_HOME=/opt/tomcat/latest"
Environment="CATALINA_PID=/opt/tomcat/latest/temp/tomcat.pid"
Environment="CATALINA_OPTS=-Xms512M -Xmx1024M -server -XX:+UseParallelGC"

ExecStart=/opt/tomcat/latest/bin/startup.sh
ExecStop=/opt/tomcat/latest/bin/shutdown.sh

[Install]
WantedBy=multi-user.target
Notify systemd that we created a new unit file and start the Tomcat service by executing:
sudo systemctl daemon-reloadsudo systemctl start tomcat
Check the Tomcat service status by typing:
sudo systemctl status tomcat● tomcat.service
Loaded: loaded (/etc/systemd/system/tomcat.service; disabled; vendor preset: enabled)
Active: active (running) since Wed 2018-06-06 10:51:36 UTC; 3s ago
Process: 21187 ExecStart=/opt/tomcat/latest/bin/startup.sh (code=exited, status=0/SUCCESS)
Main PID: 21195 (java)
Tasks: 44 (limit: 4915)
CGroup: /system.slice/tomcat.service
If there are no errors you can enable the Tomcat service to be automatically started at boot time:
sudo systemctl enable tomcatYou can start stop and restart Tomcat same as any other systemd unit service:
sudo systemctl start tomcatsudo systemctl stop tomcatsudo systemctl restart tomcat
Adjust the Firewall
If your firewall running on your Debian system
and you want to access the tomcat interface from the outside of your local network you’ll need to open the port 8080:
sudo ufw allow 8080/tcpConfigure Tomcat Web Management Interface
Now that Tomcat is installed on your Debian server the next step is to create a user with access to the web management interface.
Tomcat users and their roles are defined in the tomcat-users.xml file.
If you open the file you will notice that it is filled with comments and examples describing how to configure the file.
sudo vim /opt/tomcat/latest/conf/tomcat-users.xmlWe will define our new user with access the tomcat web interface (manager-gui and admin-gui) in the tomcat-users.xml file as shown below. Be sure you change the username and password to something more secure:
<tomcat-users>
<!--
    Comments
-->
   <role rolename="admin-gui"/>
   <role rolename="manager-gui"/>
   <user username="admin" password="admin_password" roles="admin-gui,manager-gui"/>
</tomcat-users>
By default the Tomcat web management interface allows access only from the localhost. If you want to access the web interface from a remote IP or from anywhere which is not recommended because it is a security risk you can open the following files and make the following changes.
If you need to access the web interface from anywhere open the following files and comment or remove the lines highlighted in yellow:
<Context antiResourceLocking="false" privileged="true" >
<!--
  <Valve className="org.apache.catalina.valves.RemoteAddrValve"
         allow="127\.\d+\.\d+\.\d+|::1|0:0:0:0:0:0:0:1" />
-->
</Context><Context antiResourceLocking="false" privileged="true" >
<!--
<Valve className="org.apache.catalina.valves.RemoteAddrValve"
allow="127\.\d+\.\d+\.\d+|::1|0:0:0:0:0:0:0:1" />
-->
</Context>If you need to access the web interface only from a specific IP, instead of commenting the blocks add your public IP to the list.
Let’s say your public IP is 32.32.32.32 and you want to allow access only from that IP:
<Context antiResourceLocking="false" privileged="true" >
  <Valve className="org.apache.catalina.valves.RemoteAddrValve"
         allow="127\.\d+\.\d+\.\d+|::1|0:0:0:0:0:0:0:1|32.32.32.32" />
</Context><Context antiResourceLocking="false" privileged="true" >
<Valve className="org.apache.catalina.valves.RemoteAddrValve"
allow="127\.\d+\.\d+\.\d+|::1|0:0:0:0:0:0:0:1|32.32.32.32" />
</Context>The list of allowed IP addresses is a list separated with vertical bar |. You can add single IP addresses or use a regular expressions.
Restart the Tomcat service for changes to take effect:
sudo systemctl restart tomcatTest the Installation
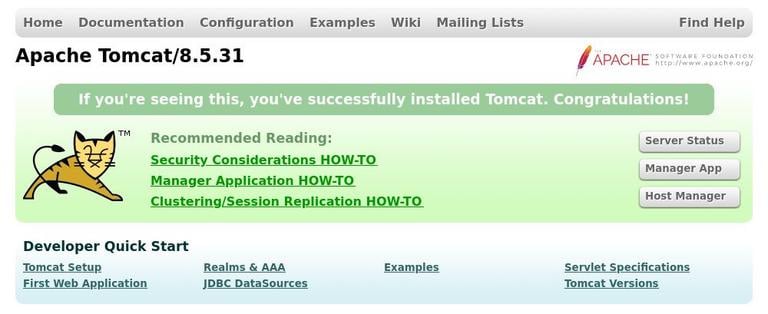
Open your browser and type: http://<your_domain_or_IP_address>:8080
If the installation is successful, a screen similar to the following will appear:
Tomcat web application manager dashboard is available at http://<your_domain_or_IP_address>:8080/manager/html. From here, you can deploy, undeploy, start, stop and reload your applications.
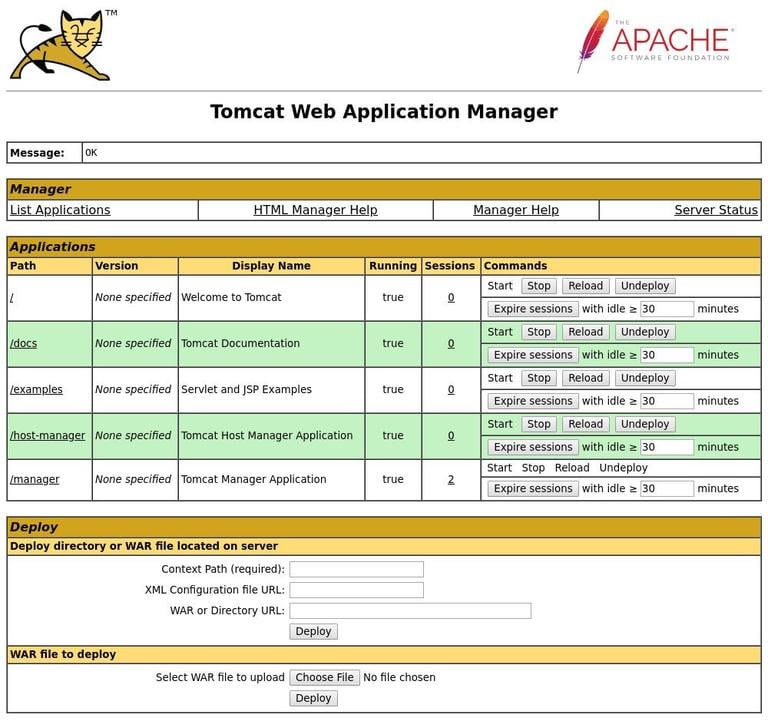
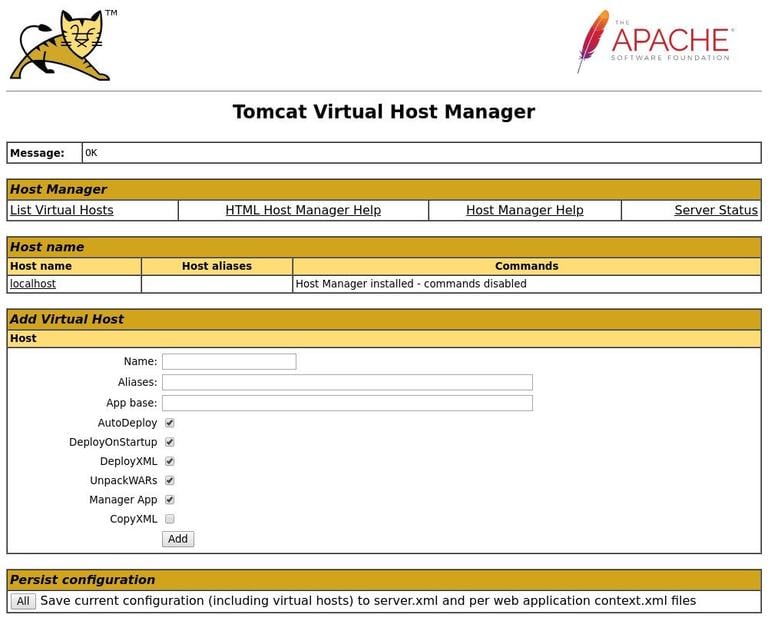
Tomcat virtual host manager dashboard is available at http://<your_domain_or_IP_address>:8080/host-manager/html. From here, you can create, delete and manage Tomcat virtual hosts.
Conclusion
You have successfully installed Tomcat 8.5 on your Debian 9 system. You can now visit the official Apache Tomcat 8 Documentation and learn more about the Apache Tomcat features.
If you hit a problem or have feedback, leave a comment below.