How to Install Kodi on Ubuntu 18.04
Updated on
•6 min read
Kodi (formerly XBMC) is a free and open-source cross-platform media player and entertainment hub that lets you organize and play streaming media, such as videos, podcasts, music, from the Internet and local and network storage.
You can enhance the Kodi functionality by installing new add-ons and skins from the official Kodi repository and unofficial third-party repositories.
In this tutorial, we’ll walk you through how to install Kodi on Ubuntu 18.04. The same instructions apply for Ubuntu 16.04 and any other Ubuntu based distribution, including Kubuntu, Linux Mint and Elementary OS.
Prerequisites
Before continuing with this tutorial, make sure you are logged in as a user with sudo privileges .
Installing Kodi on Ubuntu
The version of Kodi included in the Ubuntu repositories always lag behind the latest Kodi realise. At the time of writing this article, the latest stable version of Kodi is version 17 Krypton.
We’ll install Kodi 17 from their official repositories. It requires no technical knowledge and it should not take you more than 10 minutes to install and configure the media server.
Follow the steps below to install the Kodi on your Ubuntu system:
Start by updating the packages list and install the dependencies by typing:
sudo apt updatesudo apt install software-properties-common apt-transport-httpsAdd the Kodi APT repository to your system’s software repository list by issuing:
sudo add-apt-repository ppa:team-xbmc/ppaWhen prompted press
Enterto continue:Official Team Kodi stable releases More info: https://launchpad.net/~team-xbmc/+archive/ubuntu/ppa Press [ENTER] to continue or Ctrl-c to cancel adding itOnce the Kodi repository is enabled, update the
aptpackage list and install the latest version of Kodi with:sudo apt updatesudo apt install kodi
That’s it! At this point, you have successfully installed Kodi on your Ubuntu 18.04 system.
Starting Kodi
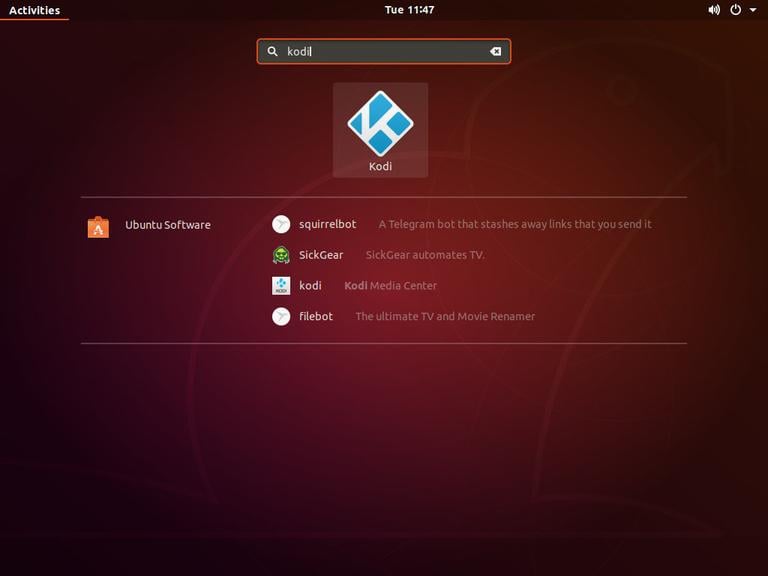
Now that Kodi is installed on your Ubuntu system you can start it either from the command line by typing kodi or by clicking on the Kodi icon (Activities -> Kodi):
When you start Kodi for the first time, a window like the following will appear:
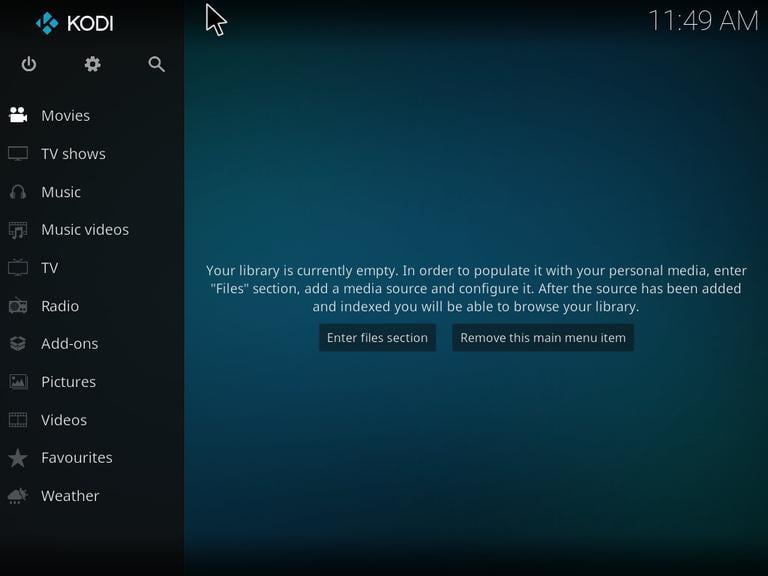
From here, you can start customizing your Kodi instance by installing new Addons and adding media libraries.
To exit Kodi either click on the “power-off” button on the top left or press CTRL+END.
Updating Kodi
When a new version is released you can update the Kodi package through your desktop standard Software Update tool or by running the following commands in your terminal:
sudo apt updatesudo apt upgrade
Uninstalling Kodi
If you want to uninstall Kodi, simply remove the installed package and disable the repository with the following command:
sudo apt remove --auto-remove kodisudo add-apt-repository --remove ppa:team-xbmc/ppa
Then remove the Kodi configuration directory by typing:
rm -r ~/.kodi/Conclusion
You have learned how to install Kodi Media Server on your Ubuntu 18.04 machine. You should now visit the official Kodi Wiki page and learn how to configure and manage your Kodi installation.
If you have any questions, please leave a comment below.