How to Install and Configure VNC on Debian 9
Updated on
•6 min read
This tutorial describes how to install and configure a VNC server on Debian 9. We will also show you how to create an SSH tunnel and securely connect to the VNC server.
Virtual Network Computing (VNC) is a graphical desktop sharing system that allows you to use your keyboard and mouse to remotely control another computer.
Prerequisites
Before continuing with the tutorial, make sure you are logged in as a user with sudo privileges .
Installing Desktop Environment
Chances are that your Debian server will not have a desktop environment installed. Our first step is to install a lightweight desktop environment.
There are several desktop environments (DE) available in Debian repositories. We’ll use Xfce as our desktop environment of choice. It is fast, stable, and lightweight, which makes it ideal for usage on a remote server.
Update the packages index and install Xfce on your Debian server with the following commands:
sudo apt install xfce4 xfce4-goodies xorg dbus-x11 x11-xserver-utilsDepending on your system, downloading and installing the Xfce packages may take some time.
Installing VNC Server
There are also several different VNC servers available in Debian repositories such as TightVNC , TigerVNC , and x11vnc . Each VNC server has its strengths and weaknesses in terms of speed and security.
We’ll be using TigerVNC, which is an actively maintained high-performance VNC server. To install TigerVNC on your Debian server issue the following command:
sudo apt install tigervnc-standalone-server tigervnc-commonOnce the VNC server is installed, run the vncserver command to create the initial configuration and set up the password. Do not use sudo
when running the following command:
vncserverYou will be prompted to enter and confirm the password and whether to set it as a view-only password. If you choose to set up a view-only password, the user will not be able to interact with the VNC instance with the mouse and the keyboard.
You will require a password to access your desktops.

Password:
Verify:
Would you like to enter a view-only password (y/n)? n
/usr/bin/xauth:  file /home/linuxize/.Xauthority does not exist

New 'debian9.localdomain:1 (linuxize)' desktop at :1 on machine debian9.localdomain

Starting applications specified in /etc/X11/Xvnc-session
Log file is /home/linuxize/.vnc/debian9.localdomain:1.log

Use xtigervncviewer -SecurityTypes VncAuth -passwd /home/linuxize/.vnc/passwd :1 to connect to the VNC server.
When you run the vncserver command for the first time, it will create and store the password file in the ~/.vnc directory.
Note the :1 after the hostname
in the output above. This indicates the display port number on which the vnc server is running. In our case, the server is running on TCP port 5901 (5900+1). If you create a second instance with vncserver it will run on the next free port i.e :2, which means that the server is running on port 5902 (5900+2).
What is important to note is that when working with VNC servers, :X is a display port that refers to 5900+X.
Before proceeding with the next step, stop the VNC instance using the vncserver command with a -kill option and the server number as an argument. In this case the server is running in port 5901 (:1), so we’ll stop it with:
vncserver -kill :1Killing Xtigervnc process ID 6677... success!
Configuring VNC Server
Now that both Xfce and TigerVNC are installed on the machine, we need to configure TigerVNC to use Xfce. To do so, create the following file:
nano ~/.vnc/xstartup#!/bin/sh
unset SESSION_MANAGER
unset DBUS_SESSION_BUS_ADDRESS
exec startxfce4
Once done, save and close the file. The script above will be automatically executed whenever you start or restart the TigerVNC server.
The ~/.vnc/xstartup file also needs to have execute permissions. Run the following chmod
command to make sure permissions are correct:
chmod u+x ~/.vnc/xstartupIf you need to pass additional options
to the VNC server, you can create a file named config and add one option per line. Here is an example:
geometry=1920x1080
dpi=96
Creating a Systemd unit file
The systemd unit file will allow us to easily start, stop, and restart the VNC service as needed.
Open your text editor and copy and paste the following configuration into it. Don’t forget to change the username on line 7 to match your username.
sudo nano /etc/systemd/system/[email protected][Unit]
Description=Remote desktop service (VNC)
After=syslog.target network.target
[Service]
Type=simple
User=linuxize
PAMName=login
PIDFile=/home/%u/.vnc/%H%i.pid
ExecStartPre=/bin/sh -c '/usr/bin/vncserver -kill :%i > /dev/null 2>&1 || :'
ExecStart=/usr/bin/vncserver :%i -geometry 1440x900 -alwaysshared -fg
ExecStop=/usr/bin/vncserver -kill :%i
[Install]
WantedBy=multi-user.targetSave and close the file.
Notify systemd that a new [email protected] file exists
by running the following command:
sudo systemctl daemon-reloadNext, enable the service:
sudo systemctl enable [email protected]The number 1 after the @ sign defines the display port on which the VNC service will run. As we discussed in the previous section since we are using 1 the VNC server will listen on port 5901.
Start the VNC service by executing:
sudo systemctl start [email protected]Verify that the service is successfully started with:
sudo systemctl status [email protected]● [email protected] - Remote desktop service (VNC)
Loaded: loaded (/etc/systemd/system/[email protected]; enabled; vendor preset: enabled)
Active: active (running) since Wed 2018-10-03 05:23:33 PDT; 51s ago
Process: 7063 ExecStartPre=/bin/sh -c /usr/bin/vncserver -kill :1 > /dev/null 2>&1 || : (code=exited, status=0/SUCCESS)
Main PID: 7071 (vncserver)
Tasks: 0 (limit: 4915)
CGroup: /system.slice/system-vncserver.slice/[email protected]
‣ 7071 /usr/bin/perl /usr/bin/vncserver :1 -geometry 1440x900 -alwaysshared -fg
Connecting to VNC server
VNC is not an encrypted protocol and can be subject to packet sniffing. The recommended approach is to create an SSH tunnel that will securely forward traffic from your local machine on port 5901 to the server on the same port.
Set Up SSH Tunneling on Linux and macOS
If you run Linux, macOS or any other Unix-based operating system on your machine, you can easily create an SSH tunnel with the ssh
command:
ssh -L 5901:127.0.0.1:5901 -N -f -l username server_ip_addressYou will be prompted to enter the user password.
Do not forget to replace username and server_ip_address with your username and the IP address of your server.
Set Up SSH Tunneling on Windows
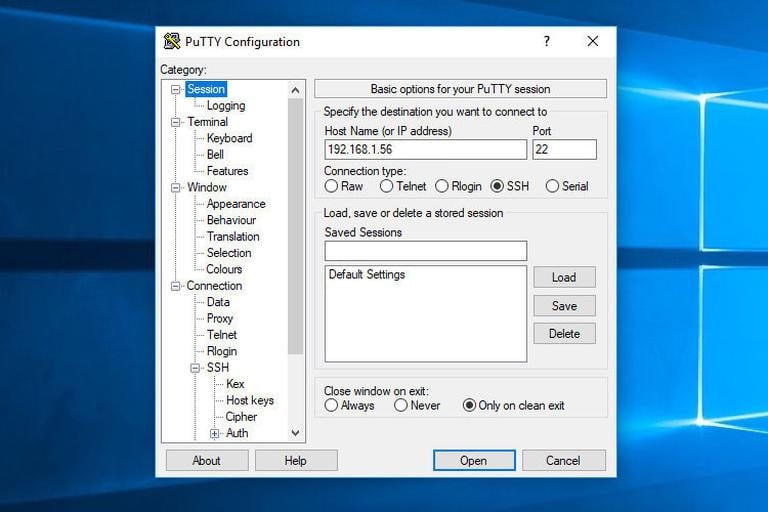
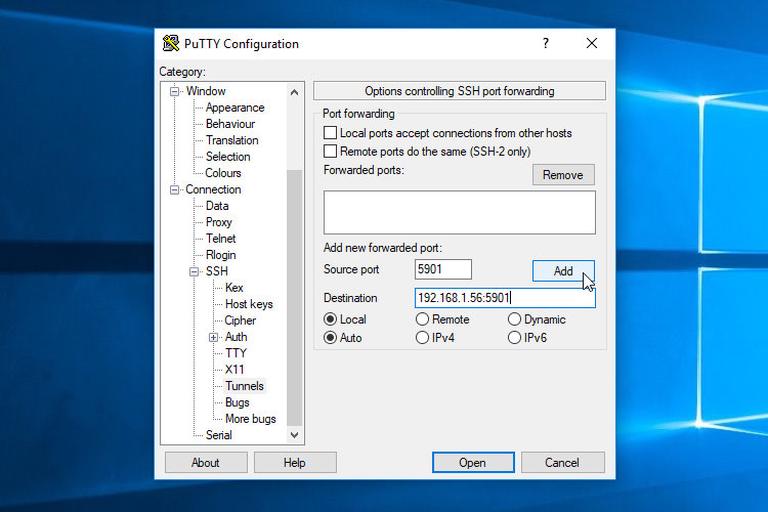
If you run Windows, you can set up SSH Tunneling using the PuTTY SSH client .
Open Putty and enter your server IP Address in the Host name or IP address field.
Under the Connection menu, expand SSH and select Tunnels. Enter the VNC server port (5901) in the Source Port field and enter server_ip_address:5901 in the Destination field and click on the Add button as shown in the image below:
Go back to the Session page to save the settings so that you do not need to enter them each time. Now all you need to do is to select the saved session and login to the remote server by clicking on the Open button.
Connecting using Vncviewer
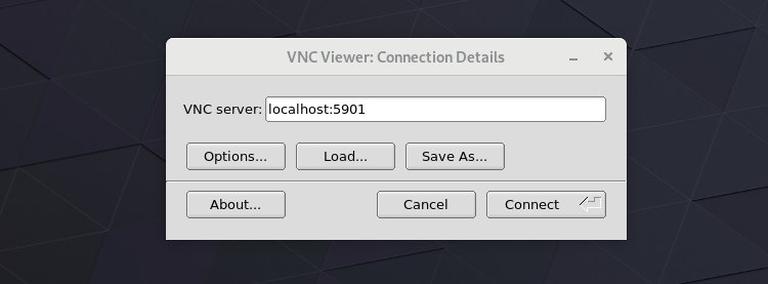
Now that you’ve set up SSH tunneling, it is time to open your Vncviewer and to connect to the VNC Server at localhost:5901.
You can use any VNC viewer such as TigerVNC, TightVNC, RealVNC, UltraVNC, Vinagre, and VNC Viewer for Google Chrome .
In this example, we’ll be using TigerVNC. Open your VNC viewer, enter localhost:5901, and click on the Connect button.
Enter your password when prompted, and you should see the default Xfce desktop. It should look something like this:

At this point, you have successfully connected to your server via VNC. You can now start interacting with the remote XFCE desktop from your local machine using your keyboard and mouse.
Conclusion
By now, you should have a VNC server up and running and you can easily manage your Debian 9 server from your local computer using a graphic interface.
To configure your VNC server to start a display for more than one user, create the initial configuration and set up the password using the vncserver command. You will also need to create a new service file using a different port.
Feel free to leave a comment if you have any questions.