How to Install and Configure Redmine on Debian 9
Updated on
•6 min read

Redmine is a free and open-source project management and issue tracking application. It is cross-platform and cross-database and built on top of the Ruby on Rails framework.
Redmine includes support for multiple projects, wikis, issue tracking system, forums, calendars, email notifications, and much more.
In this tutorial, we’ll show you how to install and configure the latest version of Redmine on a Debian 9 server using MySQL as a database back-end and Passenger + Nginx as a Ruby application server.
Prerequisites
Make sure that you have met the following prerequisites before continuing with this tutorial:
- Have a domain name pointing to your server public IP. We will use
example.com. - Logged in as a user with sudo privileges .
- Have Nginx installed .
- Have an SSL certificate installed for your domain.
Creating a MySQL database
Redmine supports MySQL/MariaDB, Microsoft SQL Server, SQLite 3 and PostgreSQL . We’ll use MariaDB as a database back-end. Make sure you have at least MySQL 5.7 or MariaDB 10.3 installed on your machine.
If MariaDB or MySQL is not installed on your Debian server you can install it using these instructions .
Start by logging in to the MySQL console by typing:
sudo mysqlRun the following SQL statement to create a new database :
CREATE DATABASE redmine CHARACTER SET utf8mb4;Create a new MySQL user account and grant access to the database :
GRANT ALL ON redmine.* TO 'redmine'@'localhost' IDENTIFIED BY 'change-with-strong-password';change-with-strong-password with a strong password.Once done, log out from the MariaDB console by typing:
EXIT;Installing Ruby
The easiest way to install Ruby on Debian is by using the apt
package manager:
Install Ruby by typing:
sudo apt install ruby-fullAt the time of writing, the version in the Debian repositories is 2.3.3p222 which is supported by the latest version of Redmine.
If you want to install Ruby via Rbenv or RVM visit this tutorial .
Installing Passenger and Nginx
Passenger is a fast and lightweight web application server for Ruby, Node.js, and Python that can be integrated with Apache and Nginx. We will install Passenger as an Nginx module.
Make sure Nginx is installed before continuing with the following steps.
Installing the necessary packages to enable an https repository:
sudo apt install dirmngr gnupg apt-transport-https ca-certificates software-properties-commonImport the repository GPG key and enable the Phusionpassenger repository:
sudo apt-key adv --recv-keys --keyserver hkp://keyserver.ubuntu.com:80 561F9B9CAC40B2F7sudo add-apt-repository 'deb https://oss-binaries.phusionpassenger.com/apt/passenger stretch main'
Update the packages list and install the Passenger Nginx module with:
sudo apt updatesudo apt install libnginx-mod-http-passenger
Installing Redmine on Debian
Start by installing the dependencies necessary to build Redmine:
sudo apt install build-essential libmariadbclient-dev imagemagick libmagickwand-dev curl ruby-dev libxslt-dev libxml2-dev zlib1g-devAt the time of writing this article, the latest stable version of Redmine is version 4.0.4.
Before continuing with the next step you should check the Redmine download page to for a newer version.
1. Downloading Redmine
Download the Redmine archive using the following curl command :
sudo curl -L http://www.redmine.org/releases/redmine-4.0.4.tar.gz -o /tmp/redmine.tar.gzOnce the download is completed extract the archive and move
it to the /opt directory:
cd /tmpsudo tar zxf /tmp/redmine.tar.gzsudo mv /tmp/redmine-4.0.4 /opt/redmine
2. Configuring Redmine Database
Copy the Redmine example configuration file:
sudo cp /opt/redmine/config/database.yml.example /opt/redmine/config/database.ymlOpen the file with your text editor:
sudo nano /opt/redmine/config/database.ymlSearch for the production section and enter the MySQL database and user information we created previously:
production:
  adapter: mysql2
  database: redmine
  host: localhost
  username: redmine
  password: "change-with-strong-password"
  encoding: utf8
Once done, save the file and exit the editor.
3. Installing Ruby dependencies
Navigate to the redmine directory and install bundler and other Ruby dependencies:
cd /opt/redmine/sudo gem install bundler --no-rdoc --no-risudo bundle install --without development test postgresql sqlite
4. Generate Keys and Migrate the Database
Run the following command to generate keys and migrate the database:
cd /opt/redmine/sudo bundle exec rake generate_secret_tokensudo RAILS_ENV=production bundle exec rake db:migrate
5. Set the correct Permissions
Nginx runs as www-data user and group. Set the correct permissions by issuing following chown command
:
sudo chown -R www-data: /opt/redmine/Configure Nginx
By now, you should already have Nginx with SSL certificate installed on your system, if not check the prerequisites for this tutorial.
Open your text editor and create the following Nginx server block file:
sudo nano /etc/nginx/sites-available/example.com# Redirect HTTP -> HTTPS
server {
listen 80;
server_name www.example.com example.com;
include snippets/letsencrypt.conf;
return 301 https://example.com$request_uri;
}
# Redirect WWW -> NON WWW
server {
listen 443 ssl http2;
server_name www.example.com;
ssl_certificate /etc/letsencrypt/live/example.com/fullchain.pem;
ssl_certificate_key /etc/letsencrypt/live/example.com/privkey.pem;
ssl_trusted_certificate /etc/letsencrypt/live/example.com/chain.pem;
include snippets/ssl.conf;
return 301 https://example.com$request_uri;
}
server {
listen 443 ssl http2;
server_name example.com;
root /opt/redmine/public;
# SSL parameters
ssl_certificate /etc/letsencrypt/live/example.com/fullchain.pem;
ssl_certificate_key /etc/letsencrypt/live/example.com/privkey.pem;
ssl_trusted_certificate /etc/letsencrypt/live/example.com/chain.pem;
include snippets/ssl.conf;
include snippets/letsencrypt.conf;
# log files
access_log /var/log/nginx/example.com.access.log;
error_log /var/log/nginx/example.com.error.log;
passenger_enabled on;
passenger_min_instances 1;
client_max_body_size 10m;
}
Enable the server block by creating a symbolic link to the sites-enabled directory:
sudo ln -s /etc/nginx/sites-available/example.com /etc/nginx/sites-enabled/Before restarting the Nginx service make a test to be sure that there are no syntax errors:
sudo nginx -tIf there are no errors the output should look like this:
nginx: the configuration file /etc/nginx/nginx.conf syntax is ok
nginx: configuration file /etc/nginx/nginx.conf test is successful
Finally, restart the Nginx service by typing:
sudo systemctl restart nginxAccessing Redmine
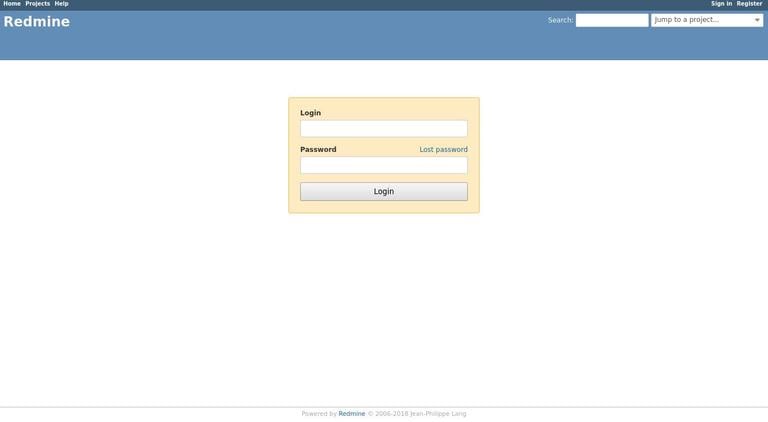
Open your browser , type your domain and assuming the installation is successful, a screen similar to the following will appear:

The default login credentials for Redmine are:
- Username: admin
- Password: admin
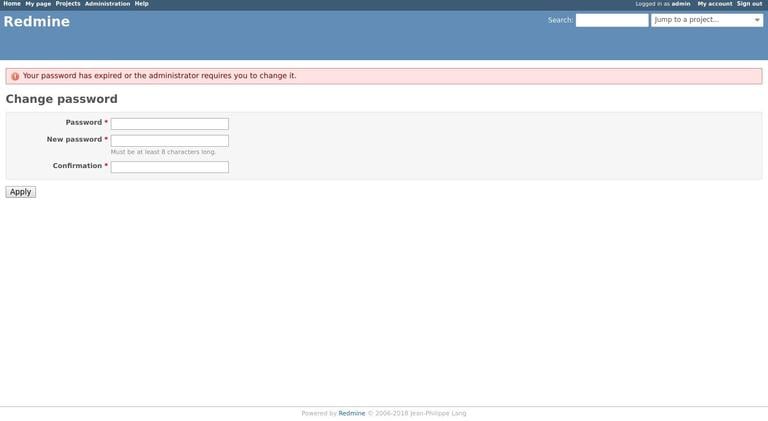
When you log in for the first time, you will be prompted to change the password as shown below:

Once you change the password you will be redirected to the user account page.
Conclusion
You have successfully installed Redmine on your Debian system. You should now check the Redmine Documentation and learn more about how to configure and use Redmine.
If you hit a problem or have feedback, leave a comment below.


