How to Install Anaconda on CentOS 7
Updated on
•6 min read

Anaconda is the most popular python data science and machine learning platform, used for large-scale data processing, predictive analytics, and scientific computing. Anaconda distribution ships with more than 1,000 data packages, the conda command-line tool and with a desktop graphical user interface called Anaconda Navigator.
This tutorial will go through the steps of downloading and installing Anaconda for Python 3 on CentOS 7.
Installing Anaconda
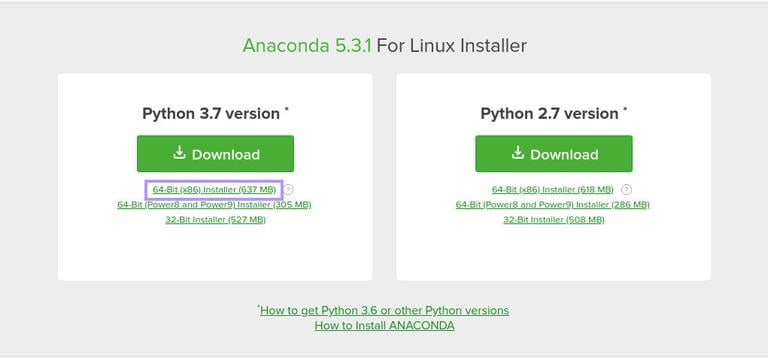
At the time of writing this article, the latest stable version of Anaconda is version 5.3.1. Before downloading the Anaconda installer script visit the Anaconda Downloads page and check if there is a new version of Anaconda for Python 3 available for download.
Perform the following steps to install Anaconda on CentOS 7:
Download the Anaconda Installation Script.
Navigate to the
/tmpdirectory and download the Anaconda installation script using the link that you copied from the Downloads page:cd /tmpcurl -O https://repo.anaconda.com/archive/Anaconda3-5.3.1-Linux-x86_64.shThe download may take some time depending on your connection speed.
Verify the Data Integrity of the Script.
Use the
sha256sumcommand to verify the script checksum:sha256sum Anaconda3-5.3.1-Linux-x86_64.shYou should see an output like the following:
d4c4256a8f46173b675dd6a62d12f566ed3487f932bab6bb7058f06c124bcc27 Anaconda3-5.3.1-Linux-x86_64.shMake sure the hash printed from the command above matches the one available at the Anaconda with Python 3 on 64-bit Linux page for your appropriate Anaconda version.
https://docs.anaconda.com/anaconda/install/hashes/Anaconda3-5.3.1-Linux-x86_64.sh-hash.html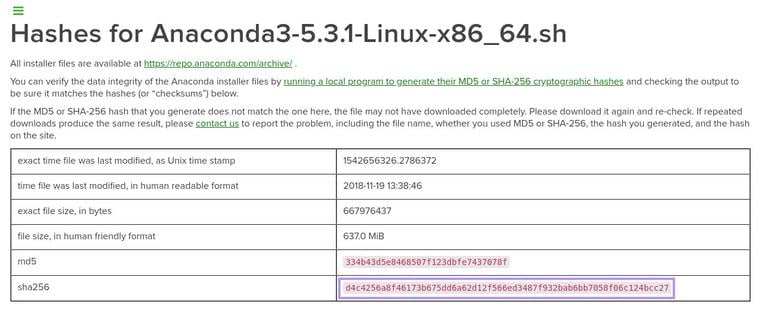
Run the Anaconda Installation Script
To start the Anaconda installation process run the installation script:
bash Anaconda3-5.3.1-Linux-x86_64.shYou should see an output like the following:
Welcome to Anaconda3 5.3.1

In order to continue the installation process, please review the license
agreement.
Please, press ENTER to continue
Press
ENTERto continue and then pressENTERto scroll through the license. Once you’re done reviewing the license, you’ll be asked to approve the license terms:Do you accept the license terms? [yes|no]Type
yesto accept the license and you’ll be prompted to choose the installation location.Anaconda3 will now be installed into this location: /home/linuxize/anaconda3 - Press ENTER to confirm the location - Press CTRL-C to abort the installation - Or specify a different location belowThe default location is fine for most users, press
ENTERto confirm the location and installation process will continue.If you get an error saying
bunzip2: command not found, install thebzip2package with:sudo yum install bzip2.The installation may take some time and once it is completed, the following output will be displayed:
Installation finished.

Do you wish the installer to initialize Anaconda3
in your /home/linuxize/.bashrc ? [yes|no]
If you want to use the
condacommand typeyespressENTERand you’ll be presented the following output:Appending source /home/linuxize/anaconda3/bin/activate to /home/linuxize/.bashrc A backup will be made to: /home/linuxize/.bashrc-anaconda3.bak For this change to become active, you have to open a new terminal. Thank you for installing Anaconda3!The installer will also ask you whether you would like to download and install Visual Studio Code.
Anaconda is partnered with Microsoft! Microsoft VSCode is a streamlined
code editor with support for development operations like debugging, task
running and version control.

To install Visual Studio Code, you will need:
    - Administrator Privileges
    - Internet connectivity

Visual Studio Code License: https://code.visualstudio.com/license

Do you wish to proceed with the installation of Microsoft VSCode? [yes|no]
You can find more information about Visual Studio on the editor website . If you want to install Visual Studio Code type
yesotherwise typeno.To activate the Anaconda installation load the new
PATHenvironment variable which was added by the Anaconda installer into the current shell session with the following command:source ~/.bashrcVerify the Installation
You can verify your Anaconda installation using the
condacommand. For example to display information about current conda install type:conda infoactive environment : base active env location : /home/linuxize/anaconda3 shell level : 1 user config file : /home/linuxize/.condarc populated config files : conda version : 4.5.11 conda-build version : 3.15.1 python version : 3.7.0.final.0 base environment : /home/linuxize/anaconda3 (writable) channel URLs : https://repo.anaconda.com/pkgs/main/linux-64 https://repo.anaconda.com/pkgs/main/noarch https://repo.anaconda.com/pkgs/free/linux-64 https://repo.anaconda.com/pkgs/free/noarch https://repo.anaconda.com/pkgs/r/linux-64 https://repo.anaconda.com/pkgs/r/noarch https://repo.anaconda.com/pkgs/pro/linux-64 https://repo.anaconda.com/pkgs/pro/noarch package cache : /home/linuxize/anaconda3/pkgs /home/linuxize/.conda/pkgs envs directories : /home/linuxize/anaconda3/envs /home/linuxize/.conda/envs platform : linux-64 user-agent : conda/4.5.11 requests/2.19.1 CPython/3.7.0 Linux/3.10.0-957.1.3.el7.x86_64 centos/7 glibc/2.17 UID:GID : 0:0 netrc file : None offline mode : False
Updating Anaconda
Updating the Anaconda is a pretty straight forward process, first update the conda tool with:
conda update condaWhen prompted to confirm the update, type y to proceed.
Once conda is updated, proceed with the Anaconda update:
conda update anacondaSame as with the previous command, when prompted, type y to proceed.
You should regularly update your Anaconda installation.
Uninstalling Anaconda
If you want to uninstall Anaconda from your CentOS system, follow the steps below:
Remove the Anaconda install directory.
To remove the entire Anaconda installation directory type:
rm -rf ~/anaconda3Edit the PATH environment variable.
Edit the
~/.bashrcfile and remove the code added by the Anaconda installer:~/.bashrc# added by Anaconda3 5.3.1 installer # >>> conda init >>> # !! Contents within this block are managed by 'conda init' !! __conda_setup="$(CONDA_REPORT_ERRORS=false '/home/linuxize/anaconda3/bin/conda' shell.bash hook 2> /dev/null)" if [ $? -eq 0 ]; then \eval "$__conda_setup" else if [ -f "/home/linuxize/anaconda3/etc/profile.d/conda.sh" ]; then . "/home/linuxize/anaconda3/etc/profile.d/conda.sh" CONDA_CHANGEPS1=false conda activate base else \export PATH="/home/linuxize/anaconda3/bin:$PATH" fi fi unset __conda_setup # <<< conda init <<<Remove the hidden files.
The following command will remove the hidden files and folders that have been created in your user home directory:
rm -rf ~/.condarc ~/.conda ~/.continuum
Conclusion
Now that you have downloaded and installed Anaconda your CentOS system, you can check the official Getting started with conda guide.
If you hit a problem or have feedback, leave a comment below.