How to Change Hostname on Ubuntu 22.04
Updated on
•6 min read

A hostname is a human-readable label assigned to a device and used to identify the device on a network. The hostname is set during the installation of the operating system or dynamically assigned to the virtual machine when it is created.
Every machine on a network should have a unique hostname. Having two or more machines with the same hostname on the same network can cause problems.
Only root or users with sudo privileges
can change the system hostname. In Ubuntu, you can edit the system hostname and related settings using GUI or the hostnamectl command.
This article explains how to set or change the hostname on Ubuntu 22.04 without needing to restart the system, using either the command line or GUI.
Displaying the Current Hostname
To view the current hostname, invoke the hostnamectl command without any argument:
hostnamectl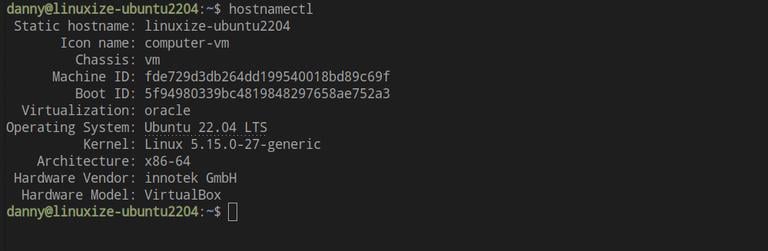
In this example, the current hostname is set to ubuntu2004.localdomain.
Changing the System Hostname with hostnamectl
This hostnamectl command recognizes three different classes of hostname:
static- The traditional hostname. It is stored in the/etc/hostnamefile and can be set by the user.pretty- A descriptive free-form UTF8 hostname used for presentation to the user. For example,Linuxize's laptop.transient- A dynamic hostname that is maintained by the kernel. DHCP or mDNS servers can change the transient hostname at run time. By default, it is the same as thestatichostname.
Generally, it is recommended to use a fully-qualified domain name (FQDN
), such as host.example.com, for both static and transient names.
Changing the system hostname is a simple process. The syntax of the hostnamectl command is as follows:
sudo hostnamectl set-hostname host.example.comsudo hostnamectl set-hostname "Your Pretty HostName" --prettysudo hostnamectl set-hostname host.example.com --staticsudo hostnamectl set-hostname host.example.com --transient
For example, to change the system static hostname to zoe.linuxize.com, you would use the following command:
sudo hostnamectl set-hostname zoe.linuxize.comOptionally, you can also set the pretty hostname:
sudo hostnamectl set-hostname "Linuxize's laptop" --prettyhostnamectl does not produce output. On success, 0 is returned; a non-zero failure code otherwise.
The static hostname is stored in /etc/hostname, and the pretty hostname is stored in /etc/machine-info file.
To verify the hostname has been changed, enter the hostnamectl command:
sudo hostnamectlYour new hostname will be printed on the terminal:
   Static hostname: zoe.linuxize.com
   Pretty hostname: Linuxize's desktop
         Icon name: computer-vm
           Chassis: vm
        Machine ID: a04e3543f3da460294926b7c41e87a0d
           Boot ID: aa31b274703440dfb622ef2bd84c52cb
    Virtualization: oracle
  Operating System: Ubuntu 22.04 LTS
            Kernel: Linux 5.4.0-26-generic
      Architecture: x86-64
Changing the hostname in the GUI
If you are running Ubuntu Desktop, you can use GNOME Settings to change your machine hostname.
Open the system menu in the top-right corner and click on the “Settings” as shown below:

In the “Settings” window, go to the “About” tab and click on “Device name”. Enter your new system hostname in the new dialog window and hit the “Rename” button.
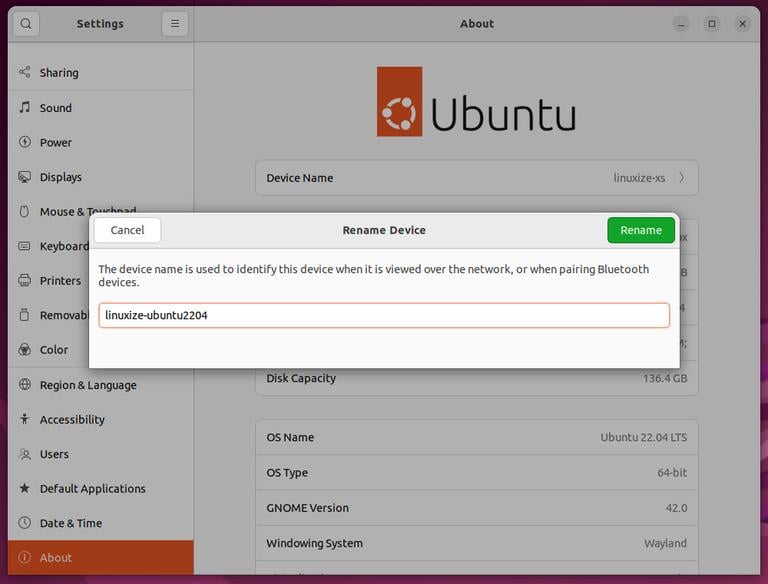
This will change both the static and pretty names.
The /etc/hosts File
If your system hostname doesn’t have a public DNS name, you’ll need to map the hostname to the local IP address.
The /etc/hosts file is used to map IP addresses to host names. This mapping is used by network applications running on the instance.
Open the file and change the old hostname to the new one:
127.0.0.1   localhost
127.0.0.1   zoe.linuxize.com

# The following lines are desirable for IPv6 capable hosts
::1     localhost ip6-localhost ip6-loopback
ff02::1 ip6-allnodes
ff02::2 ip6-allrouters
Ubuntu Cloud Server
If you run Ubuntu on a cloud instance and the cloud-init package is installed, the changed hostname will be restored after a system restart. This package is usually installed by default in the images provided by the cloud providers, and it is used to handle the initialization of the cloud instances.
To make the change permanent, edit the /etc/cloud/cloud.cfg file.
sudo vim /etc/cloud/cloud.cfgSearch
for preserve_hostname, and change the value from false to true:
# This will cause the set+update hostname module to not operate (if true)
preserve_hostname: true
Save the file and close your editor.
If the file doesn’t exist on your system, it means that the cloud-init package is not installed and you don’t have to make any further changes.
Conclusion
We have shown you how to easily change the hostname on an Ubuntu 22.04 installation without restarting the machine.
There are a number of reasons why you may need to change the hostname. The most common is when the hostname is automatically set upon the instance creation.
Feel free to leave a comment if you have any questions.